www.tanwater.com
Getting Pictures Ready To Send
Whether you are planning to send pictures that were taken with a digital camera or pictures that were
scanned and saved, there are a few things to do before sending them. The first consideration is size.
Some programs will automatically resize the pictures when they are displayed so that they fit on the
screen. If you have the pictures in a folder and look at them with the Windows Picture Viewer, they
look like they are the perfect size to send in an email. The displayed size is deceptive. The Windows
Picture Viewer and many other photo organization programs resize the pictures to display them on the
screen. The actual picture size could be 5 time too large to fit the screen. The pictures will not be resized
when they are received in an email.
There are several good reasons to resize pictures before emailing them. The first reason is the pictures are
not going to fit the screen when they are received. The person you are sending the pictures to will either
have to resize them, or scroll around the screen trying to figure out what the picture is by only looking at a
small part of it at the time. The second good reason is file size. While file size may not be as important to
someone with a high speed connection, it is very important to people who use a dial up connection. It could
take hours for someone on dial up to download a few pictures that have not been re-sized. Speed considerations
aside, it doesn't make sense to send a huge file when a file that is one eigth the size will do the same job.
With the Windows Picture Viewer and most others, there is an easy way to find out what size the pictures really
are. If you hover the mouse pointer over the picture, you should get a pop up display that tells three things,
the demensions of the picture in pixels (size), the type (or format) of the picture, and the file size. We will get to
the type or format of the picture later. The first consideration is the size of the picture in pixels and reducing the
size of the picture will also reduce the file size.
There are two common picture sizes that are used in email. A picture that is 800X600 pixels (that is 800 little colored
dots wide and 600 little colored dots high) will just fit the computer screen when it is not resized. This would be a good
size to send if only one or two pictures are being sent and you wish to present more details. The next smaller size is
the ideal size for email pictures. It shows enough detail in most cases and is a smaller file size. The 640X480 size is just
right for most email pictures. You may not be able to reduce the pictures to exactly these sizes if the original picture is
not a standard picture size or it was taken with the vertical dimension being the longer measurement. These standard
sizes should be used as an approximate guide for non-standard pictures. Further down the page are some suggested
ways of re-sizing pictures for email.
Not all email pictures should be reduced in size. Pictures that will be used to make prints need to be sent full size to
preserve the details in the picture. Also documents that are scanned in to email should be sent full size in most cases.
Not only is size a factor when emailing pictures, but the picture format also needs to be correct. Almost all email pictures
should be in either JPEG (JPG) or GIF format. The format can be determined by hovering the mouse pointer over the icon or
thumbnail of the picture's file in a folder. The format can also be determined by looking at the full file name. The last letters
in the full file name (suffix) tell what type or format the file is saved in. Most photographs should be emailed in JPG format.
Photos can be sent in GIF format, but the picture quality is better using JPG. The GIF format is used mostly for drawings
or animations.
Probably the photos in your folders are much too large to email. There are many ways to re-size pictures. One of the easiest
ways is to use a photo editing program. Often a photo editing program will be included on a disk which might come with a
new digital camera. There are so many different editing program that it would be impossible to include them all here. This
web page will cover two of the commonly used editing programs which are normally available to everyone.
Re-sizing Pictures With MS Paint
Microsoft Paint is a simple graphics program included with many Windows operating system. If there is not a Paint icon on
the desktop, click the Start button and look in All Programs. Click to open the Paint program.
To load the picture you wish to re-size into the Paint, click File on the top tool bar, then click Open.
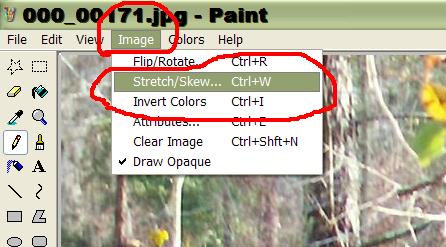
Navigate to the picture you want to re-size and click it. It will load into the Paint program. Click Image on the top
tool bar and choose Stretch/Skew.
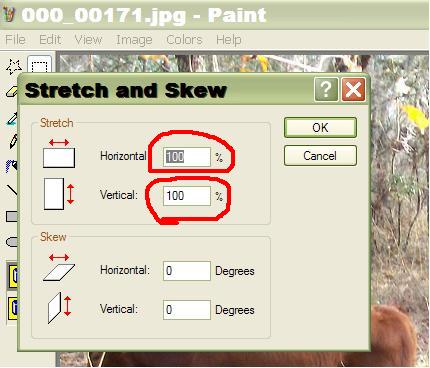
A dialog box will open giving options. Ignore the skew options. In the stretch options, there are two boxes, one for horizontal
and one for vertical. Both boxes should have 100% in them. The 100% is the full size picture that is loaded in Paint.
To reduce the picture until it is three fourths as large, click the numbers and change them both to 75%. If you want to reduce
the picture until it is half as large, then change both the numbers to 50%. If you want to make the picture one fourth as large,
then change both numbers to 25%. The size of the picture can be changed to any numbers between 1% and 99% with a
corresponding reduction in the size of the picture. After re-setting the numbers, clicking on the OK button will change
the picture size. Some experimentation may be nessesary to get the size you need. By running the mouse pointer to the lower
right corner, just inside the picture, the size of the picture will be displayed on the right side of the lower Paint tool bar.
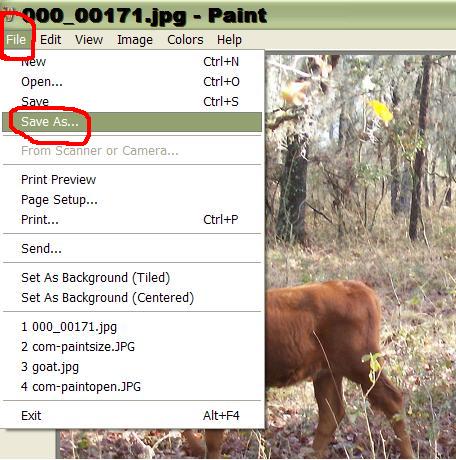
After the picture is reduced to the size you require, it must be saved to a folder. If you save it to the same folder it was in,
without changing the file name, the smaller picture will replace the full size picture. You will usually not want to replace
the full size copy with a reduced size. To avoid this, click File on the top tool bar, and choose the Save As
option.
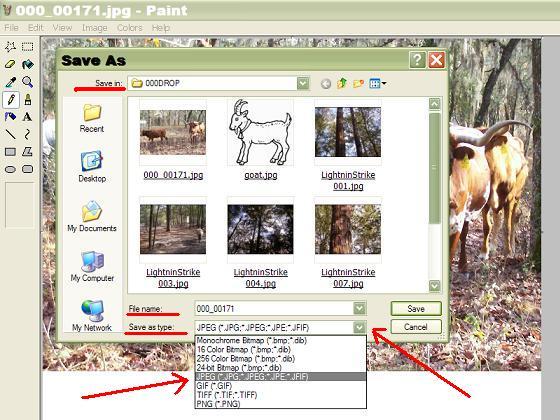
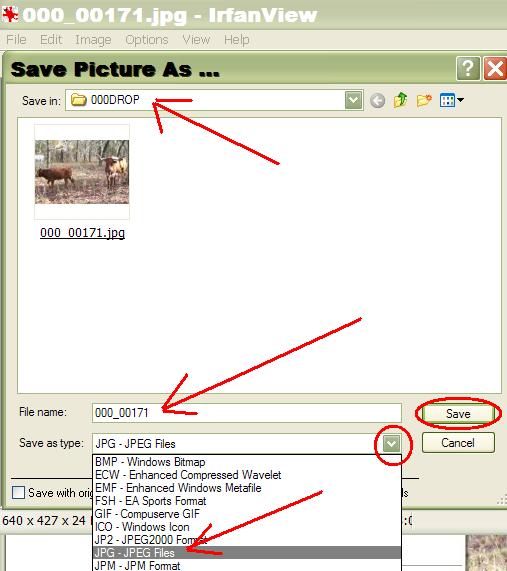
The 'Save As' dialog box will open. At the top of the box, choose the folder on your computer to save the re-sized picture in.
The folder that the re-sized picture will be saved in should appear in the Save In box at the top. At the bottom is the
File Name box. In this box, type the new name for the re-sized picture. Just changing or adding one letter will be
enough to keep the smaller picture from overwriting (replacing) the full size picture. Adding an S to the end of the file name
that is already in the box will keep the smaller picture from replacing the full size picture and indicate which is the re-sized
picture if they are kept in the same folder. Just below the 'File Name' box is the Save As Type box. This is where
you choose the format to save the picture as. If JPEG or JPG is already in the box, it will not need to be changed. If some
other format is in the box, click the small down arrow on the right, then choose JPEG from the drop down menu which
will open. Pictures may be sent in either JPG or GIF format. JPG format will be higher quality pictures. Animated pictures will
be in GIF format and they must stay in GIF format. After the format letters are in the box, click the Save button.
The re-sized pictures should now be saved in the folder that was specified and be ready to attach to an email.
Re-sizing Pictures With Irfanview
Irfanview is a very nice little graphics editing program that is easy to use. Irfanview is freeware and available for downloading.
There are many websites which offer Irfanview. Choose the one nearest to your geographic location. Irfanview can be downloaded
from;
With the Irfanview program properly installed, there should be an Irfanview icon on the desktop. Click it to open the Irfanview
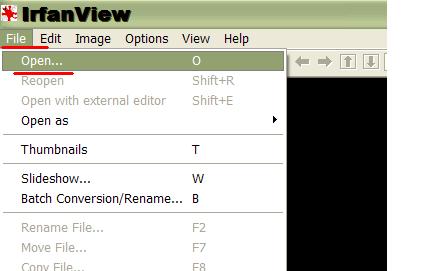
program. Now you must locate the picture you wish to re-size in your picture folders and open it in Irfanview. Click File
on the top tool bar and click Open on the menu that drops down.
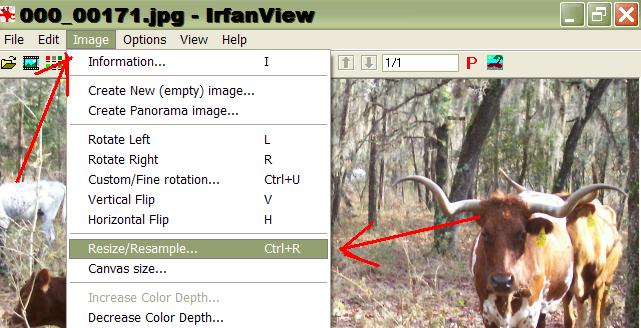
Navigate to the folder that contains the picture to be re-sized and click on the picture. It will open in the Irfanview program.
Click Image on the top Irfanview tool bar and select Resize/Resample from the drop down menu which opens.
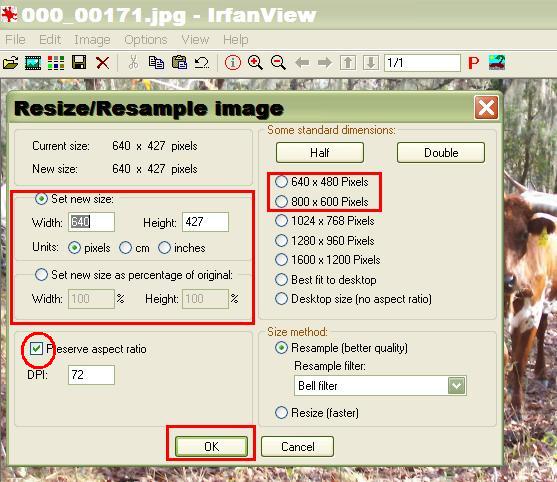
There are several choices for the method you use to re-size. The easiest is to just put a dot in the circle of one of the standard sizes
in the right hand column by clicking it, then click the OK button at the bottom. The final size is listed in pixels (640X480 or 800X600). You might wish to specify the exact size or a percentage reduction. Clicking the circle for either of these choices will
activate that section of the menu and you can enter the figures you wish to use. Also notice there is a check box at the bottom
for 'Preserve Aspect Ratio'. The aspect ratio box should always have a check mark in it. If it is not checked and you specify a
picture size which is not in the correct ratio to the original picture, your re-sized picture will look stretched or shortened. Click the
OK button after you make the choice of size. Your picture should immediately assume the newly specified size.
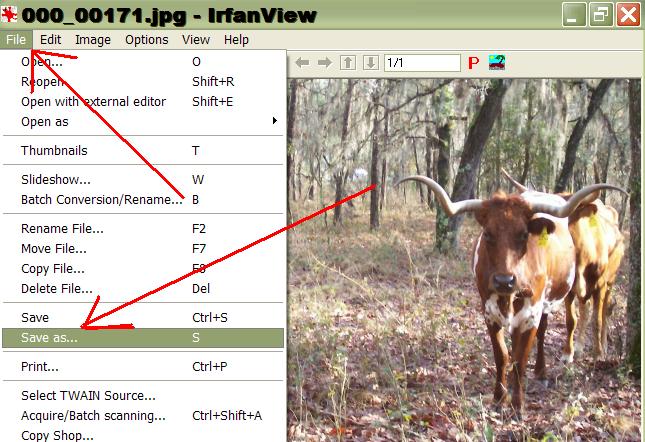
After you are satisfied with the re-sized picture, you must save it in a folder. If you save it to the same folder it was in,
without changing the file name, the smaller picture will replace the full size picture. You will usually not want to replace
the full size copy with a reduced size. To avoid this, click File on the top tool bar, and choose the Save As
option.
The 'Save As' dialog box should open. At the top of the box, choose the folder on your computer to save the re-sized picture in.
The folder that the re-sized picture will be saved in should appear in the Save In box at the top. At the bottom is the
File Name box. In this box, type the new name for the re-sized picture. Just changing or adding one letter will be
enough to keep the smaller picture from overwriting (replacing) the full size picture. Adding an S to the end of the file name
that is already in the box will keep the smaller picture from replacing the full size picture and indicate which is the re-sized
picture if they are kept in the same folder. Just below the 'File Name' box is the Save As Type box. This is where
you choose the format to save the picture as. If JPEG or JPG is already in the box, it will not need to be changed. If some
other format is in the box, click the small down arrow on the right, then choose JPEG from the drop down menu which
will open. Pictures may be sent in either JPG or GIF format. JPG format will be higher quality pictures. Animated pictures will
be in GIF format and they must stay in GIF format. After the format letters are in the box, click the Save button.
The re-sized pictures should now be saved in the folder that was specified and be ready to attach to an email.
Attaching The Pictures To Email - Web Based
Before attaching pictures to an email, they should already be re-sized, in the proper format (file type), and saved in a file on the
computer. Look for any notes on web based email about restrictions on file size or file type. Even if there are restictions on file
type, the JPG files created when the pictures were re-sized should be acceptable by all web based email. Some web based email
also places a restiction on how many attachments can be sent at one time.
Attaching files to web based email is usually very simple. While all web based email cannot be covered in this article, the general
method of attaching pictures should be similar to the forms shown here. The forms shown are for two common web based email
providers. The email text should already be written in the appropriate box. The email address and subject should already be
filled in before attaching the pictures.
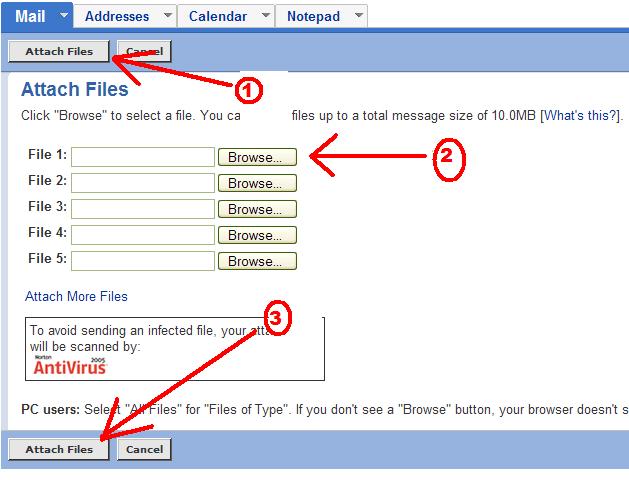
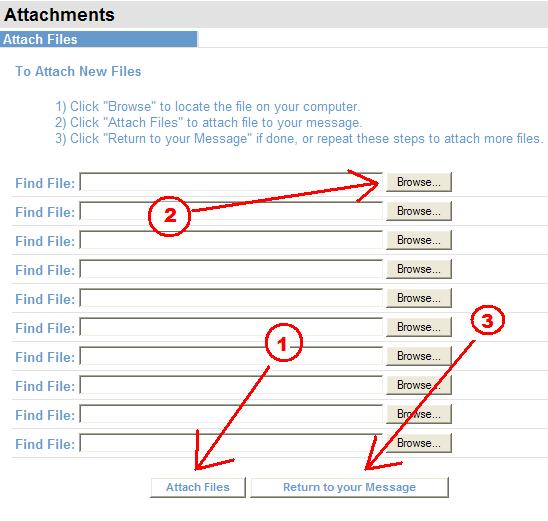
Step (1.) - Find a button on the compose email window which says [Attach] or [Attach Files] and click on it. A
window should open with several Browse buttons on it.
Step (2.) - Click on a Browse button and navigate to the folder on your computer which contains the re-sized pictures. Click
the picture that is to be attached. The path to the picture will appear next to the Browse button. Repeat this step if more than one picture is to be attached by clicking the next empty Browse button. Do not be concerned if your name appears in the path
for the picture. Your name may be in the path to locate the picture, but it will not be sent out with the picture unless the file name
of the picture itself contains your name. The path name is only to show the email program where the file is located on your computer and it will disappear except for the last entry which is the file name of the picture.
Step (3.) - Click the [Attach Files] button, usually under the Browse buttons. Wait for the picture files to be uploaded to the server. When the upload is complete a button should appear that allows you to return to the text of the email where you can make any final changes before hitting the send button.
Attaching The Pictures To Email - Outlook Express
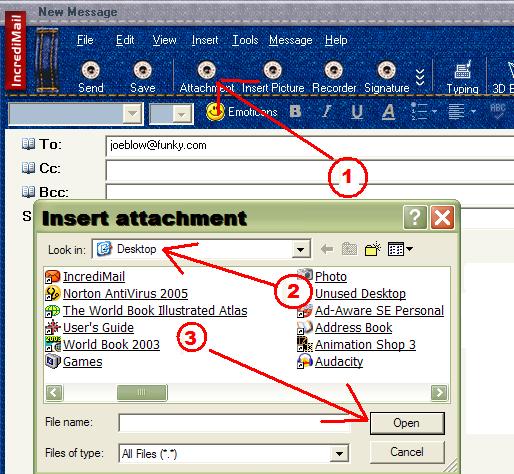
Attaching pictures to Outlook Express, Incredimail, or other computer based email programs is very similar.
Step (1.) - Click the Attach (or Attachment) button on the top tool bar of the email you have written.
Step (2.) - Navigate to the folder of the computer where the re-sized picture is located and click on it.
Step (3.) - Click the Attach button or in some cases, the Open button in the Attachment dialog window.

Sending Pictures in Email


Click to download Irfanview


Graywolf / 2004